Friday, March 25, 2011

Hummus Dip with a Scent of Earthy Cumin


Earthy Cumin Hummus Dip

Makes: 4 Cups
Serving Size: 2 Tbsp

The addition of ground Cumin gives my version of the Mediterranean dip an earthy flavor that I love.  Drizzle with some additional fruity olive oil when serving if your calories will allow it. Sprinkle with added lemon zest and fresh chopped Cilantro for color and a nice zip before serving. 

Garbanzo Beans are also known as Chickpeas. If you look closely at the bean it resembles a baby chick face. Perfect, it is spring after all.

3 1/2 cups cooked, drained Garbanzo beans ( or 2 15 1/2 oz cans of Chickpeas/Garbanzo Beans, drained and rinsed)
1/4 cup Olive Oil
2-4 Tablespoons fresh squeezed Lemon Juice
2 teaspoons Lemon Zest (from one lemon)
2 cloves fresh Garlic (germ removed) see note***
1/2 cup Tahini Sauce
1/4 cup yellow Onion, coarsely chopped
1/2 teaspoon Sea Salt
1/2-1 teaspoon gr. Cumin

Drain Garbanzo beans and place in food processor or blender. Add remaining ingredients to processor and blend for 3-5 minutes; stopping to scrape down bowl when necessary. If you are using a blender this will need to be done often to get everything down to the blades.  Blend until smooth. 

Place the dip on a large serving platter, and surround with warm toasted flatbread, pita bread or fresh crisp vegetables cut for dipping.  I always sprinkle on a bit more ground Cumin too, but then I like it earthy! 
This makes a lot of dip, but freezes well. Just divide into 1/2 or 1 cup bowls, cover and freeze.


***The sprout in the center of a garlic clove is called the germ. When garlic is young, the germ is pale, small, and tender. As the garlic ages, the germ turns green, grows larger, and develops an unpleasantly bitter quality. If your garlic has these large green sprouts and you’ll be using it raw or just quickly cooked, you’re better off removing the germ. It’s easy to do: Just cut the clove in half and use a paring knife or your fingernail to pry the germ out. (If you have a lot of cloves that are doing this, save them to plant out in your garden. These cloves are from my garden last year). Plant each clove separately and it will grow into a full garlic bulb by the beginning of winter.

 
 In the bowl for a whirl!

Scrape down the sides now and then.


Blend until nice a smooth.


Ready to EAT!!

Nutritional Information is based on 2 Tablespoons and does not include the Flatbread.


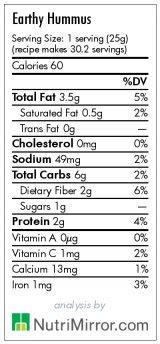
                    Nutritional Information Provided By NutriMirror.com


Tuesday, March 1, 2011

Pickled Eggs for Easter or Everyday


I originally posted this recipe for pickled eggs on my garden blog Thyme in a Bottle, last April. I thought I would post it here now that I have a blog devoted to my herbal cooking adventures.

Growing up on a turkey farm in Wisconsin we were never short on eggs. I am sure one of the reasons Mother made these eggs was because of the abundance we had. It has always been a family tradition to have these eggs on Easter morning for breakfast. 

I remember how excited I was as a child to wake up Easter morning, leaping from the bed trying to be the first one down the stairs to search for my Easter basket.  Sometimes it was in the old oven, sometimes under the sink or in the crawl space behind the stairway.  I don't remember all the hiding places now, but I do remember these EGGS! 

After finding our basket my Mother would bring out a canning jar filled to the brim with these eggs.  I remember the first sour bite of the egg, pungent from the spices and the cider vinegar she used.  I am sure that this is the reason I love the taste and smell of anything made with vinegar.

Easter Morning Pickled Eggs with Tarragon and Fig Balsamic Vinegar.

**12 hard boiled eggs, cooled and peeled. 

In a small saucepan over moderate heat add:
1 cup Rice Wine Vinegar (you may use seasoned rice wine vinegar)
½ cup Water
2 tablespoons Pickling Spices
2 slices Sweet Onion, rings separated and cut in half
5 Black Pepper Corns
1 tablespoon FreshTarragon (if using dried tarragon, 1 teaspoon should be enough)
1 tablespoon of a good quality Balsamic Vinegar (I like to use a Fig Balsamic ; this will help to make the eggs a nice rich brown color and give a wonderful earthy flavor).

Simmer this mixture for a couple of minutes. Place the eggs in a sterilized canning jar, now pour your brine over the eggs.  Make sure the spices that end up at the bottom of the saucepan go in the jar too.  If your eggs are not completely covered with liquid, add some very hot water.  Cover tightly with a new clean lid and jar ring, cool and place in refrigerator.
 
These should be made one week ahead, depending on how tangy you would like them.  I have eaten them after only 24 hours and they are very good.  Serve these with a teaspoon or so of the brine poured over the egg and a nice piece of toasted whole grain bread for your Easter Breakfast.  These eggs are a wonderful addition to salads, especially a Nicoise Salad.

You may or may not need all of this brine, it all depends on the size of your eggs and the jar.  I used a wonderful old Norge one quart canning jar that my friend brought back from a trip she made to Norway.  The 12 small chicken eggs fit perfectly and had more than enough room.

** To make 12 perfect hard boiled eggs.  Use eggs that are not fresh; week old eggs will make better hard boiled eggs and will peel easier.  Place cold eggs in a saucepan with enough room to cover the eggs with water by at least one inch.  Add 1 teaspoon cider vinegar, bring eggs to a boil.  Turn off burner; if using an electric stove remove pan from burner.  Let sit for 20 minutes; drain and run cold water over eggs for a few minutes.  I also like to add ice cubes to the water and let them sit in the pan, until cold, about 30 minutes.  Now you can peel them and make your pickled eggs. They always turn out perfectly this way.