Summer squash is often overcooked into a flavorless mash, which is sad because these squash have a delicate, delicious flavor if prepared properly. For this recipe, I used zucchini, crookneck and scallop squash prepared with the flavors of the
Southwest.
If you are not growing your own,
Farmers Markets have these
beauties available from June through early September in most areas. Pick out small squash to get the best flavor.
Avoid any patty pan over 4 inches wide; the best size for crookneck and zucchini is less than 6 inches. The seeds begin to develop if much larger
than that.
Be sure to stop over to the
Dandelion House and visit with Deborah Jean's garden and blog hop party!
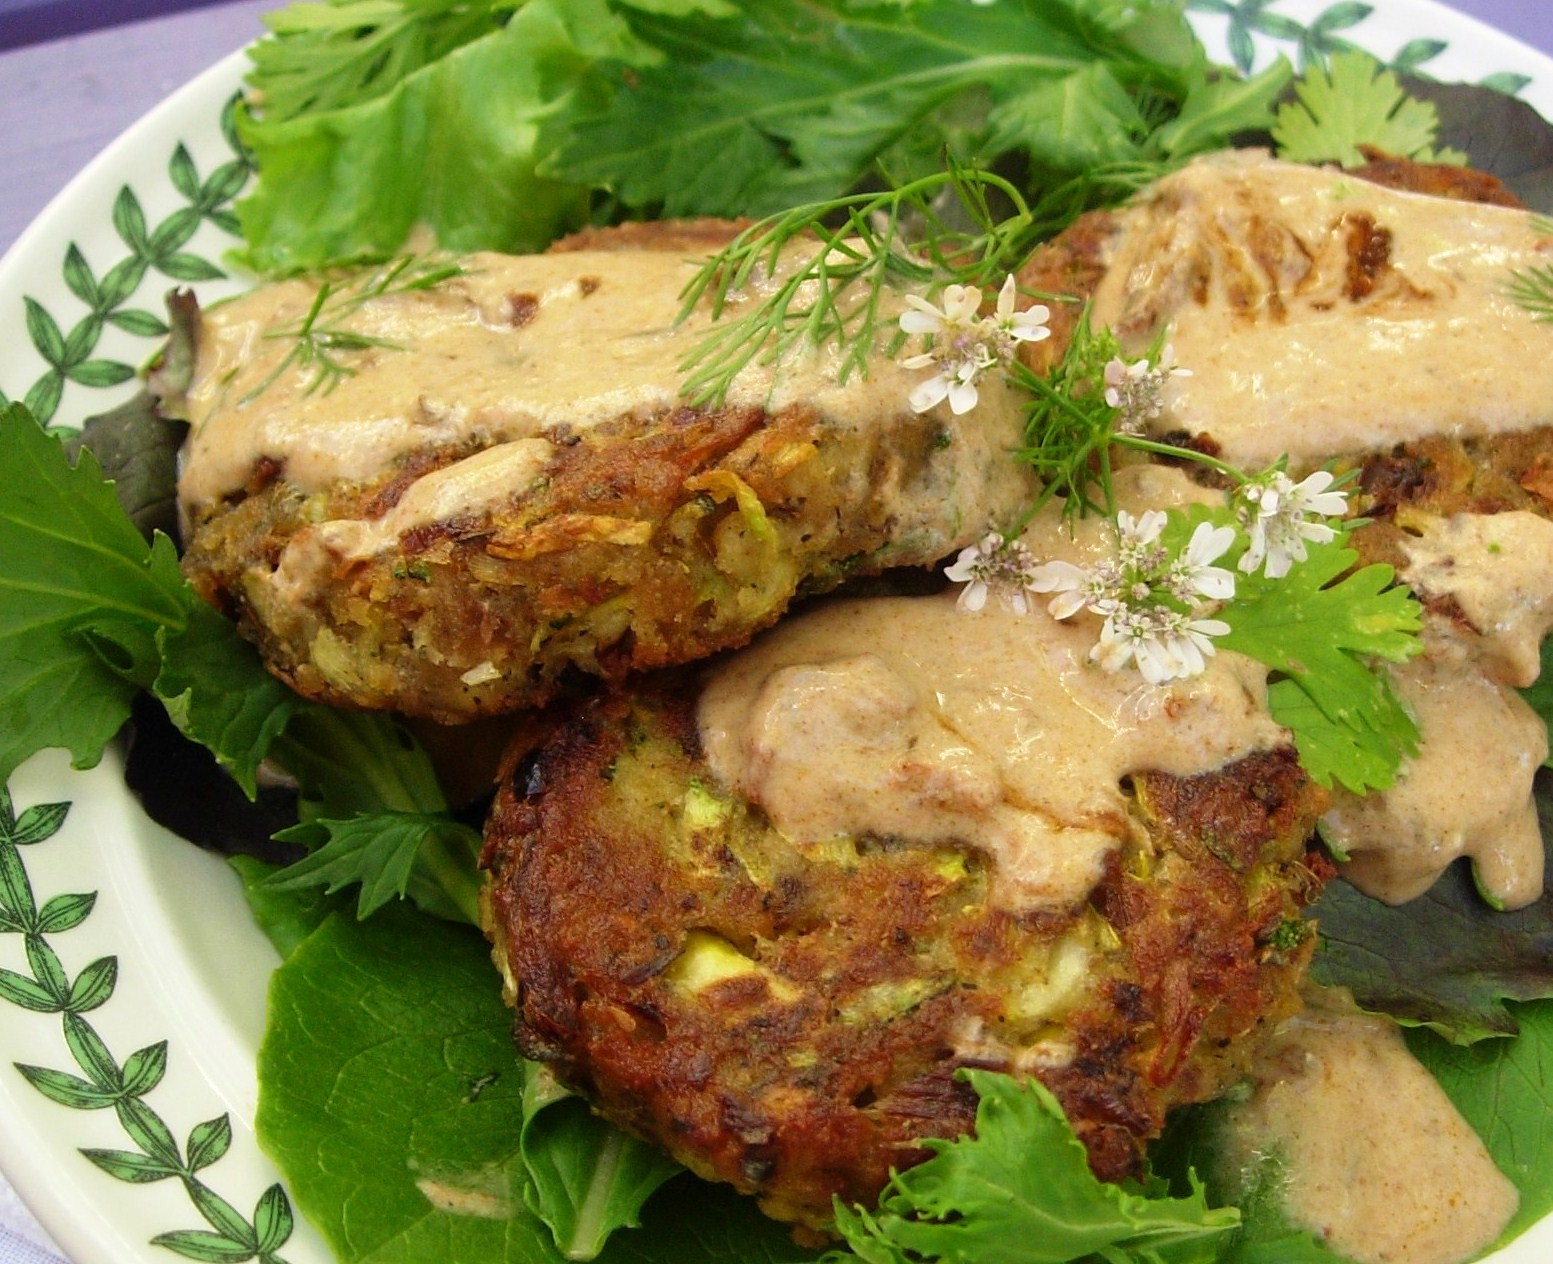
Summer Squash Patties with Ancho
Chili Yogurt Sauce, and Cilantro Flower Garnish
2 cups packed, grated, drained, Summer Squash (9 ounces)
1 cup unseasoned Bread Crumbs
1 Egg beaten
1 tablespoon (¼ ounce) dried Ancho Chili, chopped (first soaked in 1 cup
boiling water for 10 minutes then chopped)
¼ cup Green Onion with tops (¾ ounce)
½ teaspoon ground Coriander
1 teaspoon dried Mexican Oregano
1 tablespoon Butter, softened
Spring lettuces (optional)
Garnish: Cilantro leaves and flowers (optional)
For Frying: ¼ cup Canola Oil, you should have around 2 tablespoons
left in the skillet after frying.
Place grated squash in a colander and press down with a
plate that has a weight on top to drain out the juice ̶ I used a quart jar
filled with water for the weight. Allow at least 15 minutes and up to 30 to drain.
Beat the egg, measure or weigh out the drained summer squash and add the remaining ingredients, mixing
just until blended. Shape into 10
patties.
Heat skillet over medium high heat, then add the oil. Fry the patties, 5 at a time until golden
brown on each side. This takes about 3 minutes per side. Don’t move them for the first minute or two
so they won’t stick to the pan when you go to turn them. This works every time, perfectly, if you are patient. (I use a
stainless steel pan, if using a non-stick pan you can probably get away with
less oil.) Remove from pan and drain on paper towels.
Serve warm, atop a bed of spring lettuces topped with Ancho Chili
Yogurt Sauce and Cilantro leaves and flowers.
Ancho Chili Yogurt Sauce
Makes ¾ cup sauce
½ cup Plain Non-Fat Yogurt
¼ tsp. Sea Salt
¼ cup Ancho Chili Sauce (recipe below)
Combine all ingredients stirring
well, cover and refrigerate while making the squash patties.
Ancho Chili Sauce
Recipe makes a little over 3 cups.
4 to 6 Ancho Chili pods dried (if large use 4)
3 cups Boiling Water
1 tablespoon Olive Oil
2 cloves Garlic, minced
1 tablespoon ground Cumin
½ cup chopped, Brown Onion
½ teaspoon Sea Salt
1 cup Tomato Sauce (Mexican Sauce is fine)
Remove the stem end and seeds from the Ancho Chili
pods. Soak pods in 3 cups of boiling
water until softened, about 15 to 30 minutes.
Pour into a blender container and add the remaining ingredients. Blend until smooth. Pour mixture into a
skillet, add tomato sauce and simmer over low heat for 20 to 30 minutes.
This sauce is also very good for enchiladas. It is a dark,
rich flavored sauce.
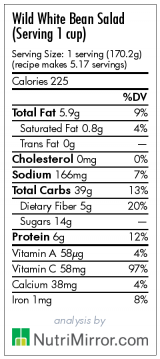
The nutritional information is for 3 patties with 2 servings of sauce and does not include the spring greens.
Nutritional Information Provided by
NutriMirror